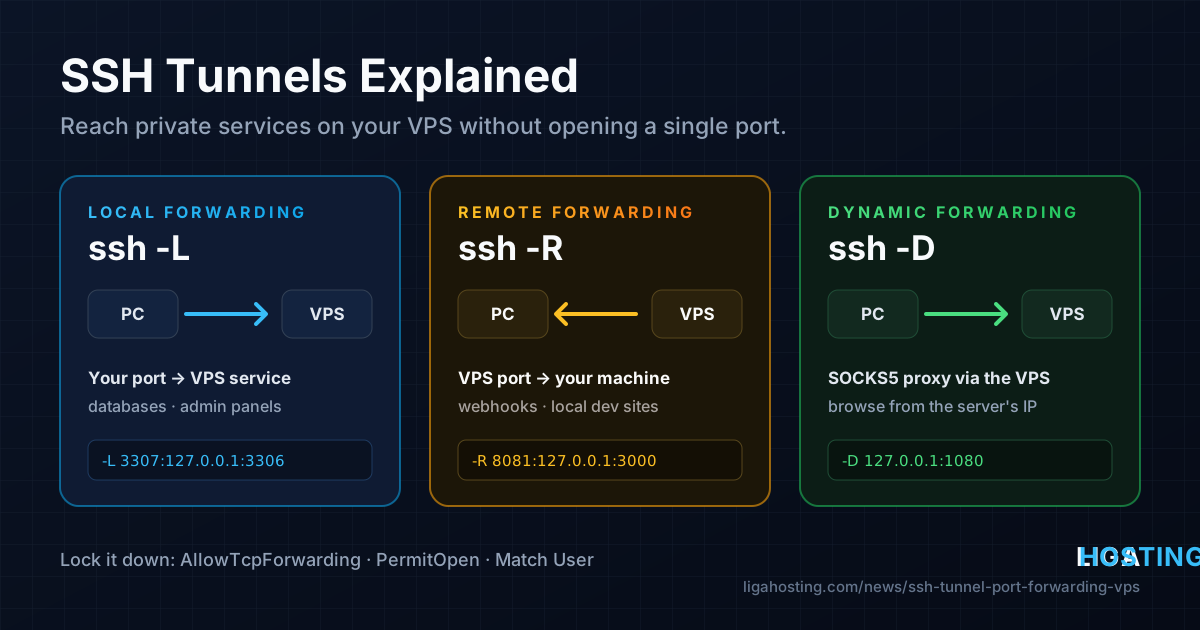
SSH Tunnels Explained — Reach Databases and Admin Panels on Your VPS Without Opening Ports
Your database listens only on 127.0.0.1, the firewall allows nothing but SSH and the web ports — exactly as it should be. But now you want to open the database in a desktop client, look at a dashboard that runs on port 8080, or show a colleague the site that is running on your laptop. The usual temptation is to open another port "just for a moment". Usually that moment never ends.
An SSH tunnel solves this without touching the firewall. You reuse the SSH connection you already trust, encrypted and authenticated with your key, and carry other traffic inside it. This guide explains the three kinds of forwarding, gives commands that work with the OpenSSH client on Linux, macOS and Windows 10/11, and shows how to keep tunnels running and how to limit what they can reach.
What an SSH tunnel actually does
SSH can do more than give you a shell. Besides the terminal session, one connection can carry extra channels: when a program connects to a port that SSH is listening on, SSH sends that traffic through the encrypted connection, and the other side opens a normal TCP connection to the destination you chose.
| Option | Name | Listener opens on | Typical use |
|---|---|---|---|
-L | Local forwarding | Your computer | Reach a service that listens only on the VPS (database, admin panel) |
-R | Remote forwarding | The VPS | Let the VPS reach a service on your computer (local dev site, webhook testing) |
-D | Dynamic forwarding | Your computer | A SOCKS proxy that sends browser or tool traffic out through the VPS |
Two options appear in almost every example below: -N tells SSH not to run a remote command (only forward), and -o ExitOnForwardFailure=yes makes SSH quit with an error if the tunnel cannot be created, instead of silently connecting without it. Log in with an SSH key — if you still use a password, see our guide to SSH keys first.
Local forwarding (-L): open a remote database on your computer
The syntax is -L [local_address:]local_port:destination:destination_port. The destination is resolved from the VPS, so 127.0.0.1 in the destination means "the VPS itself", not your computer.
First confirm on the VPS that the database really listens only locally:
sudo ss -ltnp | grep -E ':(3306|5432)\s'
# 127.0.0.1:3306 or 127.0.0.1:5432 is what you want; 0.0.0.0 means it is open on every interface
Then, on your computer:
# MySQL / MariaDB: local port 3307 -> port 3306 on the VPS
ssh -N -o ExitOnForwardFailure=yes -L 3307:127.0.0.1:3306 admin@example.com

# In a second terminal on your computer
mysql -h 127.0.0.1 -P 3307 -u appuser -p

# PostgreSQL: local port 15432 -> port 5432 on the VPS
ssh -N -o ExitOnForwardFailure=yes -L 15432:127.0.0.1:5432 admin@example.com
psql -h 127.0.0.1 -p 15432 -U appuser appdb
A few details that save time:
- Use a different local port (3307, 15432) if the same database also runs on your computer; otherwise you get "Address already in use".
- Type
127.0.0.1, notlocalhost, in the MySQL client. The mysql client treatslocalhostas "use the local Unix socket" and never touches the tunnel. - Graphical clients (DBeaver, MySQL Workbench, pgAdmin, TablePlus and similar) usually have a built-in "SSH tunnel" tab that does the same thing. Fill in the SSH host and key there, and use
127.0.0.1and the real database port as the database host. - The database still sees the connection as coming from
127.0.0.1, so a user created as'appuser'@'localhost'in MySQL works without changes.
Stop the tunnel with Ctrl+C. While it runs, check it from your computer with ss -ltn | grep 3307 (Linux) or lsof -iTCP:3307 -sTCP:LISTEN (macOS).
Reach web dashboards and internal apps the same way
Anything that listens on the VPS loopback can be opened like this: an app server on port 3000 that Nginx normally hides, a monitoring dashboard, a queue admin page, or a container that publishes only on 127.0.0.1.
# Several forwards in one connection
ssh -N -o ExitOnForwardFailure=yes \
  -L 8080:127.0.0.1:8080 \
  -L 9000:127.0.0.1:9000 \
  admin@example.com

# Then open http://127.0.0.1:8080 and http://127.0.0.1:9000 in your browser
For Docker, publish internal tools only on loopback, for example ports: ["127.0.0.1:8080:80"] in Compose. Ports published as plain "8080:80" listen on every interface, and Docker's own firewall rules can make them reachable even when UFW looks closed.
Remote forwarding (-R): let the VPS reach your computer
Remote forwarding is the mirror image: SSH opens a listener on the VPS and carries connections back to your machine. That is useful when you want a public server to reach something running behind your home router or office NAT — for example, a local development site that must receive webhooks.
# On your computer: port 8081 on the VPS -> port 3000 on your computer
ssh -N -o ExitOnForwardFailure=yes -R 8081:127.0.0.1:3000 admin@example.com

# On the VPS, while the tunnel is up
curl -I http://127.0.0.1:8081/
By default the listener on the VPS binds only to 127.0.0.1. That is the safe choice: point an existing Nginx site at it (proxy_pass http://127.0.0.1:8081;) and you get HTTPS and a real host name in front of your local app, without exposing a raw port.
Making the port public directly requires GatewayPorts clientspecified on the server and a firewall rule; for anything beyond a quick test, the Nginx approach is cleaner.
Dynamic forwarding (-D): a quick SOCKS proxy through your VPS
With -D, SSH becomes a SOCKS5 proxy on your computer. Every program you configure to use it sends its connections out from the VPS, with the VPS's IP address.
ssh -N -D 127.0.0.1:1080 admin@example.com

# Test: this should print the IP address of your VPS, not your own
curl --socks5-hostname 127.0.0.1:1080 https://ifconfig.me
In a browser, set a SOCKS5 proxy of 127.0.0.1 port 1080 (in Firefox, also enable "Proxy DNS when using SOCKS v5" so name lookups go through the tunnel too). Typical uses are checking how a site looks from the server's location, reaching an IP-restricted admin page, or getting through a hotel Wi-Fi that blocks odd ports.
A SOCKS tunnel covers only the programs you configure, and it runs over TCP. If you want all traffic from a device protected, a real VPN is the better tool — see our WireGuard setup guide.
Jump hosts (-J): reach servers that have no public SSH
A common hardening pattern is a single entry server (a bastion), with other machines accepting SSH only from it. -J (ProxyJump) connects through the bastion in one step, and your key never has to be copied to it:
# Shell on the internal server through the bastion
ssh -J admin@bastion.example.com admin@10.0.0.5

# Combined with a tunnel: the database on 10.0.0.5 becomes local port 15432
ssh -N -J admin@bastion.example.com -L 15432:127.0.0.1:5432 admin@10.0.0.5
The end-to-end session is encrypted from your computer to the final server; the bastion only relays the bytes. Avoid ssh -A (agent forwarding) as a replacement for this: it lets anyone with root on the bastion use your agent while you are connected.
Save your tunnels in ~/.ssh/config
Long commands are easy to mistype. The client configuration file lets you give each tunnel a short name:
# ~/.ssh/config on your computer
Host vps
    HostName example.com
    User admin
    IdentityFile ~/.ssh/id_ed25519
    ServerAliveInterval 30
    ServerAliveCountMax 3

Host vps-db
    HostName example.com
    User admin
    IdentityFile ~/.ssh/id_ed25519
    LocalForward 127.0.0.1:15432 127.0.0.1:5432
    LocalForward 127.0.0.1:8080 127.0.0.1:8080
    ExitOnForwardFailure yes
    SessionType none

Host internal
    HostName 10.0.0.5
    User admin
    ProxyJump vps
Now ssh vps-db opens both tunnels and ssh internal goes through the jump host. SessionType none is the config equivalent of -N (OpenSSH 8.7 and newer; on older clients just add -N to the command). ServerAliveInterval sends a small keep-alive every 30 seconds so idle tunnels are not dropped by home routers and NAT devices, and SSH notices a dead connection after about 90 seconds.
Keep a tunnel running with systemd
Sometimes a tunnel must be permanent — for example, an application on one server that reads a database on another without exposing it. A small systemd service restarts the tunnel whenever it drops, with no extra packages. On the server that starts the tunnel, create /etc/systemd/system/db-tunnel.service:
[Unit]
Description=SSH tunnel to the database on example.com
After=network-online.target
Wants=network-online.target

[Service]
User=deploy
ExecStart=/usr/bin/ssh -NT \
  -o BatchMode=yes \
  -o ExitOnForwardFailure=yes \
  -o ServerAliveInterval=30 \
  -o ServerAliveCountMax=3 \
  -i /home/deploy/.ssh/id_ed25519_tunnel \
  -L 127.0.0.1:15432:127.0.0.1:5432 \
  tunnel@example.com
Restart=always
RestartSec=10

[Install]
WantedBy=multi-user.target
# Connect once by hand as that user so the host key is stored in known_hosts
sudo -u deploy ssh -i /home/deploy/.ssh/id_ed25519_tunnel tunnel@example.com true
sudo systemctl daemon-reload
sudo systemctl enable --now db-tunnel
systemctl status db-tunnel
ss -ltn | grep 15432
journalctl -u db-tunnel -n 20BatchMode=yes makes SSH fail instead of waiting for a password or a host-key question nobody will answer, and Restart=always brings it back after network problems or reboots. The package autossh does a similar job if you prefer it, but plain ssh under systemd is usually enough.
Lock tunnels down on the server
Port forwarding is enabled by default in OpenSSH (AllowTcpForwarding yes). That means every account that can log in over SSH can also tunnel to any address the server can reach. For a key used only by a tunnel — like the systemd service above — give it a dedicated account that can do nothing else.
# Ubuntu / Debian
sudo adduser --disabled-password --gecos "" tunnel
# AlmaLinux
sudo useradd -m tunnel

sudo install -d -m 700 -o tunnel -g tunnel /home/tunnel/.ssh
# Paste the public key of the tunnel client into this file
sudo nano /home/tunnel/.ssh/authorized_keys
sudo chown tunnel:tunnel /home/tunnel/.ssh/authorized_keys
sudo chmod 600 /home/tunnel/.ssh/authorized_keys
Then create /etc/ssh/sshd_config.d/50-tunnel.conf. The drop-in directory is included by default on current Ubuntu, Debian and AlmaLinux:
Match User tunnel
    AllowTcpForwarding local
    PermitOpen 127.0.0.1:5432
    PermitListen none
    X11Forwarding no
    AllowAgentForwarding no
    PermitTTY no
    ForceCommand /bin/false
# Always test before applying, so a typo cannot lock you out
sudo sshd -t
# Ubuntu / Debian
sudo systemctl restart ssh
# AlmaLinux
sudo systemctl restart sshdThis account can now open exactly one local tunnel, to port 5432 on the server, and cannot get a shell or create listeners on the server. Verify it: ssh tunnel@example.com should close immediately, and a tunnel to any other port should fail with "administratively prohibited".
If you do not use tunnels at all, you can set AllowTcpForwarding no globally. Keep your SSH session open in another window while you test any change, and make sure SSH itself stays allowed in the firewall — see our UFW basics if you are unsure.
Troubleshooting common tunnel errors
| Message | What it means and what to do |
|---|---|
bind [127.0.0.1]:3307: Address already in use | Something on your computer already uses that local port — often an old tunnel. Pick another port or find it with ss -ltnp | grep 3307 (Linux) / lsof -i :3307 (macOS). |
channel 2: open failed: connect failed: Connection refused | The tunnel works, but nothing listens at the destination as seen from the server. Check the port and address with sudo ss -ltnp on the VPS. |
open failed: administratively prohibited | The server forbids this forward: AllowTcpForwarding no, a PermitOpen rule or restrict in authorized_keys. |
Warning: remote port forwarding failed for listen port 8081 | The port is already used on the VPS, or PermitListen / AllowTcpForwarding local blocks it. Choose another port or adjust the server configuration. |
Run the client with -v to see every forward and channel. On the server, the SSH log shows refused forwards — journalctl -u ssh on Ubuntu and Debian, journalctl -u sshd on AlmaLinux. The full option reference is in the official ssh and sshd_config manual pages.
Frequently Asked Questions
Is an SSH tunnel secure enough for database access?
Yes. The traffic inside the tunnel is encrypted and protected by the same key authentication as your SSH login, and the database itself never needs to listen on a public address. It is a much safer choice than opening port 3306 or 5432 in the firewall, even with a strong database password.
Does an SSH tunnel slow down the connection?
The encryption overhead is small on modern CPUs. The latency is the same as your normal SSH connection to the server, so interactive work with a database client feels like working directly. For moving very large amounts of data, a dump with compression or rsync over SSH is usually faster than querying through a tunnel.
What is the difference between an SSH tunnel and a VPN?
An SSH tunnel forwards specific ports, or works as a SOCKS proxy for programs you configure, and needs no setup on the server beyond SSH. A VPN such as WireGuard creates a full network interface and can carry all traffic from a device. Use tunnels for occasional access to a few services, a VPN for permanent access to a whole private network.
Can I use SSH tunnels from Windows?
Yes. Windows 10 and 11 include the OpenSSH client, so every ssh -L, -R, -D and -J command in this guide works in PowerShell or Windows Terminal. PuTTY can do the same through Connection → SSH → Tunnels.
Should I disable port forwarding on my VPS?
If no one uses tunnels, setting AllowTcpForwarding no removes one capability an attacker could use with a stolen key. If you do use them, keep forwarding allowed only for the accounts that need it, with Match User blocks and PermitOpen rules as shown above.
At Liga Hosting, every Standard VPS and Performance VPS runs on KVM with full root access, a dedicated IPv4 address and DDoS protection, so you decide which ports stay closed and which services you reach only through SSH. Contact us if you have questions about network access or IP addresses on your server.