Rate Limiting in Nginx — Stop Abusive Traffic with limit_req and limit_conn
A single script hammering your login page, a scraper requesting thousands of pages per minute, a bot that keeps calling your search endpoint: none of these need to be big attacks to slow a small VPS down. Each request to a PHP or Node.js page costs CPU and memory, and a few clients can use up all your workers while real visitors wait.
Nginx has two built-in tools for this: limit_req, which limits how many requests per second a client can make, and limit_conn, which limits how many connections a client can keep open at once. This guide shows how both work, gives ready-to-use configurations for login pages, APIs and whole sites, and explains how to test them without locking out your real users.
How Nginx rate limiting works
Nginx uses the leaky bucket method. Imagine every client has a bucket that drains at a fixed speed — the rate. Each request pours some water in. As long as requests arrive no faster than the bucket drains, everything passes. When they arrive faster, the extra requests either wait in the bucket (the burst) or, once the bucket is full, are rejected.
The configuration always has two parts:
- A zone, defined once in the
httpblock. It says what identifies a client (usually its IP address), how much shared memory to use for tracking and what the rate is. - A limit, applied in a
serverorlocationblock. It says which zone to use and how much burst to allow.
Both modules (ngx_http_limit_req_module and ngx_http_limit_conn_module) are compiled into the standard Nginx packages on Ubuntu, Debian and AlmaLinux, so there is nothing extra to install. Check your version and the config syntax first:
nginx -v
sudo nginx -t
Step 1 — Define the zones
Create a small file that is loaded inside the http block. On Ubuntu, Debian and AlmaLinux, everything in /etc/nginx/conf.d/*.conf is included there by default:
sudo nano /etc/nginx/conf.d/ratelimit.conf# Requests per IP
limit_req_zone $binary_remote_addr zone=perip:10m rate=10r/s;
limit_req_zone $binary_remote_addr zone=login:10m rate=5r/m;
limit_req_zone $binary_remote_addr zone=api:10m rate=30r/s;
# Open connections per IP
limit_conn_zone $binary_remote_addr zone=connperip:10m;
# Answer with 429 Too Many Requests instead of the default 503
limit_req_status 429;
limit_conn_status 429;
# Log rejected requests as warnings instead of errors
limit_req_log_level warn;
limit_conn_log_level warn;What each part means:
$binary_remote_addr— the client IP in compact binary form. Use it instead of$remote_addr, it takes less memory.zone=perip:10m— the zone name and its size. According to the Nginx documentation, one megabyte holds about 16,000 client states, so 10 MB covers around 160,000 IP addresses. When the zone is full, Nginx removes the oldest entries; if it still cannot add a new one, the request is rejected.rate=10r/s— ten requests per second. For slow, sensitive endpoints use per minute:5r/mmeans one request every 12 seconds on average.limit_req_status 429— 429 is the correct HTTP status for "too many requests". The default 503 looks like a server failure in monitoring tools and to search engines.
Step 2 — Apply limits to the right places
Do not put one strict limit on the whole site. A single page load can easily request 30–60 files (CSS, JavaScript, images, fonts), and a limit that is fine for a login form will break normal browsing. Limit the expensive, dynamic parts instead.
Here is a typical server block for a PHP site such as WordPress:
server {
    listen 443 ssl;
    server_name example.com;
    root /var/www/example.com;
    # ssl_certificate lines omitted

    # No more than 20 open connections per IP for the whole site
    limit_conn connperip 20;

    # Static files: no request limit
    location ~* \.(css|js|png|jpe?g|gif|svg|webp|woff2?|ico)$ {
        expires 30d;
        access_log off;
    }

    # Login: 5 requests per minute, a small burst for typos
    location = /wp-login.php {
        limit_req zone=login burst=3 nodelay;
        include snippets/fastcgi-php.conf;
        fastcgi_pass unix:/run/php/php8.3-fpm.sock;
    }

    # All other PHP: 10 requests per second with room for page bursts
    location ~ \.php$ {
        limit_req zone=perip burst=20 nodelay;
        include snippets/fastcgi-php.conf;
        fastcgi_pass unix:/run/php/php8.3-fpm.sock;
    }

    location / {
        try_files $uri $uri/ /index.php?$args;
    }
}
Adjust the PHP-FPM socket path to your version (ls /run/php/ on Debian and Ubuntu; on AlmaLinux the default is unix:/run/php-fpm/www.sock and the snippets/fastcgi-php.conf file does not exist, so use your existing fastcgi_param lines). Then test and reload:
sudo nginx -t && sudo systemctl reload nginxA reload applies the new configuration without dropping open connections.
Burst, nodelay and delay — the part everyone gets wrong
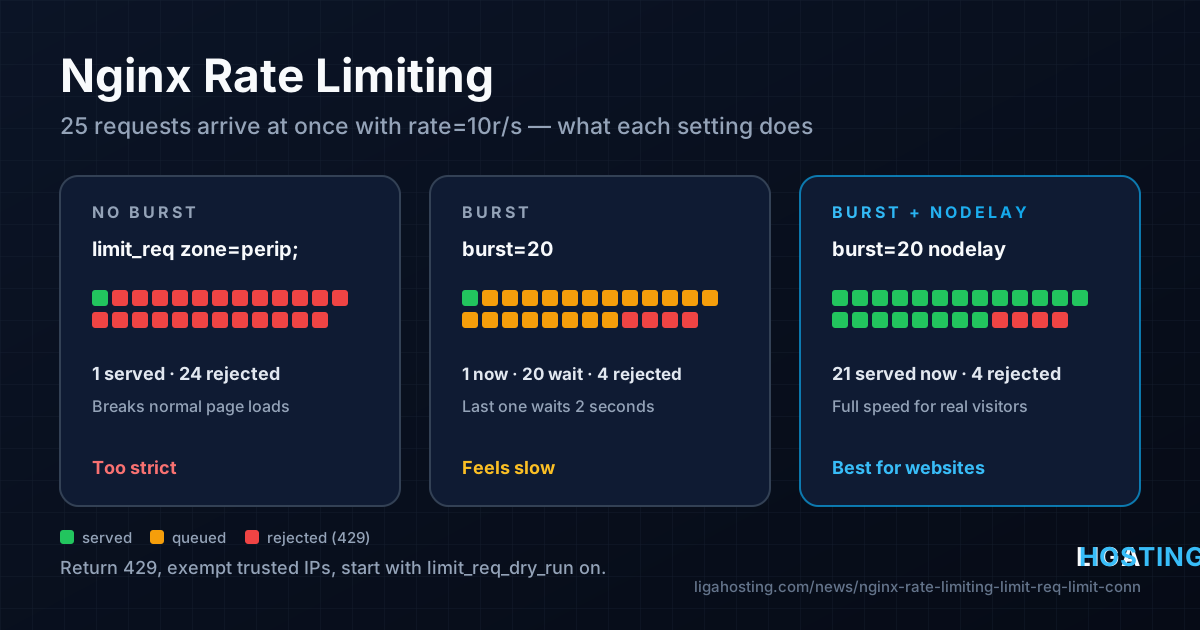
The burst and nodelay parameters decide what happens when a client goes over the rate. With rate=10r/s, Nginx actually allows one request every 100 ms. The three common forms behave very differently:
| Setting | What happens to 25 requests arriving at the same moment |
|---|---|
limit_req zone=perip; | 1 is served, 24 are rejected. Without burst, even normal page loads fail. |
limit_req zone=perip burst=20; | 1 is served at once, 20 wait in a queue and are served one every 100 ms (the last after 2 seconds), 4 are rejected. The site feels slow. |
limit_req zone=perip burst=20 nodelay; | 21 are served immediately, 4 are rejected. The 20 burst slots then free up again at 10 per second. |
limit_req zone=perip burst=20 delay=8; | The first 9 are served at once, the next 12 are delayed, 4 are rejected. A middle ground (Nginx 1.15.7 and newer). |
For websites, burst together with nodelay is almost always what you want: real users get full speed, and only clients that keep pushing above the rate are stopped. Without nodelay, queued requests hold a connection open while they wait, which is exactly what you are trying to avoid on a busy server.
Limiting connections with limit_conn
limit_conn counts connections that are open at the same time, not requests over time. It protects against clients that open many parallel connections, or keep slow downloads running, and it pairs well with limit_req.
# Whole server: 20 parallel connections per IP
limit_conn connperip 20;

# Large downloads: 2 at a time per IP, and cap the speed after the first 10 MB
location /downloads/ {
    limit_conn connperip 2;
    limit_rate_after 10m;
    limit_rate 2m;
}
Keep in mind that with HTTP/2 and HTTP/3, Nginx counts each concurrent request as a separate connection, even though the browser opened only one. A page that loads 15 files in parallel can briefly use 15 "connections". Be generous for that reason, and because offices, schools and mobile networks put many people behind one IP address.
Behind Cloudflare or a proxy: limit the real visitor IP
If your site is behind Cloudflare or another reverse proxy, $binary_remote_addr is the proxy's address, not the visitor's. Every visitor routed through the same Cloudflare server then shares one bucket, and your rate limit starts blocking legitimate traffic — usually seen as random 429 errors for normal visitors.
The fix is the real_ip module, which replaces the client address with the one from the proxy's header — but only for requests coming from trusted proxy ranges:
(for ip in $(curl -s https://www.cloudflare.com/ips-v4) $(curl -s https://www.cloudflare.com/ips-v6); do
   echo "set_real_ip_from $ip;"
 done
 echo "real_ip_header CF-Connecting-IP;") | sudo tee /etc/nginx/conf.d/cloudflare-realip.conf
sudo nginx -t && sudo systemctl reload nginx
After this, $binary_remote_addr holds the real visitor IP and the limits work per person again. Never trust a client header such as X-Forwarded-For without set_real_ip_from: anyone could send a fake value and get a fresh bucket for every request. Our article on Cloudflare error 522 explains the related firewall and fail2ban side of this setup.
Whitelist your own IPs and monitoring
Your office, your uptime monitor or a partner's server should not be limited. Nginx does not count a request when the zone key is empty, so you can build a key that is empty for trusted addresses. Replace the first limit_req_zone lines in ratelimit.conf:
geo $limit_exempt {
    default         0;
    127.0.0.1       1;
    198.51.100.0/24 1;   # your office or VPN range
}

map $limit_exempt $limit_key {
    0 $binary_remote_addr;
    1 "";
}

limit_req_zone $limit_key zone=perip:10m rate=10r/s;
limit_req_zone $limit_key zone=login:10m rate=5r/m;
The geo block marks trusted networks, and map turns that into an empty key for them and the normal IP for everyone else.
Test the limits before you trust them
Never enable a new limit on a busy production site without testing. Since Nginx 1.17.1 there is a dry-run mode: requests are counted and logged, but nothing is rejected.
location ~ \.php$ {
    limit_req zone=perip burst=20 nodelay;
    limit_req_dry_run on;
    ...
}
Reload, leave it running for a day and look for entries in the error log:
sudo grep -c 'limiting requests, dry run' /var/log/nginx/error.log
sudo grep 'limiting requests' /var/log/nginx/error.log | tail -5
If real visitors show up there, raise the rate or the burst. When the log only shows bots, remove limit_req_dry_run and reload.
To see the limit working, send requests from your own computer (not from a whitelisted IP):
# 10 quick requests to the login page; with 5r/m and burst=3 expect 4 × 200 and 6 × 429
for i in $(seq 1 10); do
  curl -s -o /dev/null -w "%{http_code}\n" https://example.com/wp-login.php
done | sort | uniq -c

# Parallel load test: apache2-utils on Ubuntu/Debian, httpd-tools on AlmaLinux
sudo apt install -y apache2-utils      # or: sudo dnf install -y httpd-tools
ab -n 200 -c 20 https://example.com/index.php
In the ab output, rejected requests appear as Non-2xx responses. In the error log you will see lines like limiting requests, excess: 20.540 by zone "perip", client: 198.51.100.7.
Turn repeat offenders into firewall bans
Rate limiting rejects requests, but the client keeps trying and Nginx still has to answer every attempt. For clients that hit the limit again and again, fail2ban can read the same log lines and block the IP in the firewall. It ships with a ready filter called nginx-limit-req:
# /etc/fail2ban/jail.local
[nginx-limit-req]
enabled  = true
port     = http,https
logpath  = /var/log/nginx/error.log
findtime = 10m
maxretry = 10
bantime  = 1h
sudo systemctl restart fail2ban
sudo fail2ban-client status nginx-limit-reqCheck that fail2ban sees the real visitor IPs (see the Cloudflare section above), otherwise it will ban your proxy. Our guide to fail2ban jails for SSH, Nginx and WordPress covers installation and testing in detail.
What rate limiting does not do
It is worth being clear about the limits of this tool:
- It is not DDoS protection. Nginx still has to receive every packet and connection. Large floods must be filtered before they reach your server, by the network-level DDoS protection in front of the VPS.
- It works per key, usually per IP. A botnet with thousands of addresses can stay under any per-IP limit. Caching and an application firewall help more there.
- It does not fix a slow application. If ten requests per second already overload your VPS, tune PHP-FPM, add caching or move to a plan with more vCPU and RAM.
- The counters are per server. With several Nginx servers behind a load balancer, each one counts separately.
Frequently Asked Questions
What is a good rate limit for a normal website?
For dynamic pages, 5–10 requests per second per IP with a burst of 20–40 and nodelay works for most sites. Login and password reset pages can be much stricter, such as 5 requests per minute. Static files usually need no request limit at all. Start in dry-run mode and adjust from your logs.
Should Nginx return 429 or 503 when the limit is reached?
Use 429 Too Many Requests by setting limit_req_status 429. It tells clients and search engines exactly what happened, while 503 looks like the server is down and can trigger false alerts in monitoring.
Why do real visitors get 429 errors?
The most common reasons are a missing burst, a limit on static files, many users behind one shared IP, or a proxy such as Cloudflare without the real_ip configuration, so that everyone shares the proxy's bucket. Check the client IPs in the error log to see which applies.
Can I use different limits for different parts of the site?
Yes. Define several zones in the http block and use a different limit_req in each location. You can also apply more than one limit_req in the same location; a request must pass all of them. Note that a location only inherits limits from the server block if it defines none of its own.
Does rate limiting work on shared hosting?
No, on shared hosting you cannot change the Nginx or Apache configuration of the server. You need a VPS or dedicated server with root access to set limit_req and limit_conn yourself.
At Liga Hosting, our Standard VPS and Performance VPS plans come with NVMe storage, network DDoS protection and full root access, so you can configure Nginx, rate limits and fail2ban exactly as shown in this guide. Contact us if you have questions about the network or your IP addresses.